How to Increase Worcester Boiler Pressure: A Simple Guide
If your Worcester boiler has low pressure, it can cause problems with heating and hot water. Luckily, it’s easy to fix this yourself by increasing the boiler pressure. Follow these simple steps to restore your boiler’s pressure and keep it working efficiently.
Table of contents
Step By Step Process for Increase Worcester Boiler Pressure
Time needed: 5 minutes
Follow the below steps to increase worcester boiler pressure
- Find the Filling Loop
The first thing to do is locate the filling loop. This is a small pipe connecting your boiler to the water supply in your home. You’ll usually find it under the boiler, and you might need to remove a small hatch to access it. Once you locate it, you’re ready to proceed.
- Use the White Plastic Key
Now, take the white plastic key that came with your boiler. This key is used to open the valve in the filling loop. Insert the key into the valve and turn it anticlockwise to open it. You’ll hear water flowing into the system, which will begin to increase the pressure.
- Add Water
Turn the key anticlockwise until the pressure gauge shows that the pressure is rising. Keep an eye on the gauge while doing this. The ideal pressure for most Worcester boilers is between 1 and 1.5 bar. Aim for that range.
- Check the Pressure
Once the pressure reaches 1 to 1.5 bar, it’s time to close the valve. Turn the key clockwise to stop the flow of water. Check the pressure again to make sure it’s within the ideal range.
- Reset the Boiler (If needed)
If your boiler has a reset button, press and hold it for a few seconds to reset the system. This will help ensure the boiler runs properly after adjusting the pressure.
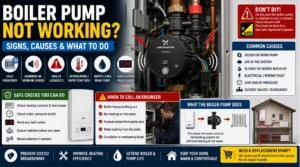
When to Call a Gas Safe Engineer
If the pressure continues to drop after you’ve followed these steps, or if you find water leaking around the system, it’s time to call a Gas Safe registered engineer. They can inspect your boiler for any underlying issues, such as leaks, faults, or worn-out parts, and fix them safely.
Conclusion
Increasing the pressure in your Worcester boiler is a straightforward process. By following these steps, you can resolve low-pressure issues and keep your boiler running smoothly. However, if the problem persists, it’s always best to contact a professional to avoid further complications.
Also find A detailed review on Worcester boilers and how to reduce pressure on Worcester boiler
Frequently Asked Questions
To raise the pressure in a Worcester boiler, locate and use the filling loop usually a flexible silver hose with two valves. Open both valves slightly to allow water into the system until the pressure gauge reads around 1.0–1.5 bar, then close them securely to avoid over-pressurising.
Open both valves (or just one, if that’s what your filling loop has) to allow cold mains water into the system. Listen out, you should hear it. Wait for the boiler pressure gauge to reach 1 to 1.5 bar. Close both valves, one after the other (or just the single valve, if that’s what you have)
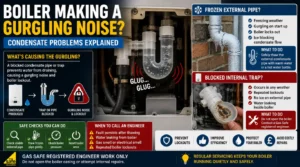
The most common causes of a Worcester boiler losing pressure are: A faulty heat exchanger. The expansion vessel needs recharging. A blocked condenser trap.
front panel
Worcester boilers typically display this pressure on a pressure gauge, which is often located on the boiler’s front panel.